Wednesday, 3 October 2012

PRODUCT SALES


Requirement: Click here

Package Creation:
  • Open BIDS.
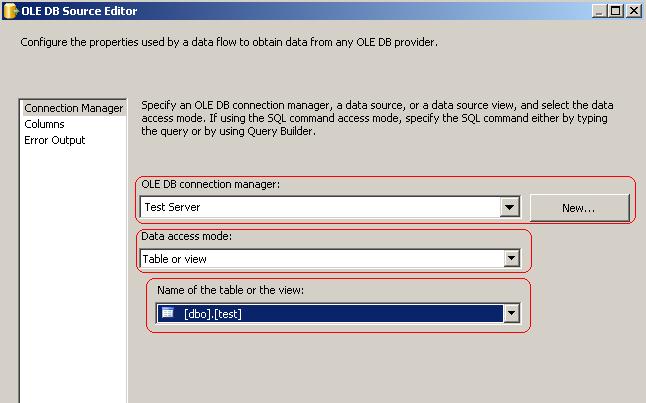
  • From data flow items drag and drop two OLEDB sources into designer surface (one is for ProdInfo table and the other one is for SaleInfo) and map with source tables.
  • From data flow items drag and drop the “Merge Join” transformation in to designer surface.
    • Merge join transformation accepts only sorted order data sets as input. So we need to sort the source data (based on common columns).
    • Both the source tables are having “Prod_ID” common column.
    • We can sort the source data in two ways
Note: If we use sort transformation then performance issue will accrue (if data volume is high). So we can use OLEDB source “Advanced Editor” option to sort the source data.
  • Select OLEDB sources green arrow and connect to the “Merge join” transformation.


  • Edit the “Merge Join” transformation and select the “Join type:” as “Left outer join”. And select the required columns. Find the below screen shot for your reference.
 
  • Drag and drop “Derived column” transformation from “Data flow” items into designer surface. Connect the “Merge Join” transformation green arrow to the “Derived column” transformation.
  • Create the required columns. Find the below screen shot for your reference.
 
  • Drag and drop “OLEDB Destination” into designer surface from data flow items.
  • Connect the “Derived column” transformation green arrow to the “OLEDB destination”.
  • Configure the OLEDB destination with target table.
 
  • Execute the package.


Target table Data:


Sunday, 23 September 2012

AVOIDING SORT TRANSFORMATION IN SSIS


If we are using “Merge or Merge Join” transformation, we should pass sorted datasets as a source to the transformation. If we use sort transformation performance will degrade.
            We can avoid the sort transformation by using source “Advance editor” option, if source is excel or OLEDB.

Example:
  • Edit the source (excel or OLEDB source) and change the “Data access mode:” to “SQL Command”.

  • Writ the select statement for source table with order by (on required fields).


  • Click “OK”.
  • Right click on the source and select “Show Advanced Editor” option.

  • “Advanced Editor for OLEDB Source” window will open. Click on “Input and Output Properties” option.

  • In the “Inputs and Outputs:” section, select the “OLEDB Source Output”.

  • Right side of the window “Common Properties” will enable.

  • Set “IsSorted” property as true.

  • In “Inputs and outputs:” section expand the “OLEDB Source Output” list.

  • Expand the “Output Columns” list. And select ID column because we need to sort the source data based on ID column.

  • ID column “common Properties” list set the “SortKeyPosition” as “1”.

  • Click “OK” button to complete the sorting.


Wednesday, 19 September 2012

OLEDB DESTINATION


            OLEDB destination is required to store the final result set into data base objects.

  • From data flow items, drag and drop the “OLEDB Destination” into designer surface.

  • Connect the source/transformation green arrow to the “OLEDB Destination”.

  • For “OLEDB Destination” connection manager required to access the “data base objects”. So create a new connection manager (If connection manager not created).
  • Right click on the “OLEDB Destination” and select “Edit” option. Then “OLEDB Destination Editor” window will open.


  • If target table is new table that we need to create, then click the "New" button. Find the highlighted part in the below screen shot for your reference.

  • “Create table” window will open, with create table script. Modify the table name.

  • Press “OK” button. Then “Create Table” window will get disappears.
  • Table creation is finished.
  • Click on the “Mappings” option in “OLEDB Destination Editor” window.

  • Verify the mappings.

  • Then press “OK” button. OLEDB Target mappings are finished, execute the package.


OLEDB CONNECTION MANAGER


            OLEDB connection manager is required to access the data base object from the data base servers.

  • Open the BIDS. Right click on the “Connection managers” and select “New OLEDB Connection”, find the below screen shot for reference.


  • “Configure OLEDB Connection Manager” Window will open. Then click on the “New” button.

  • “Connection Manager” window will open.

  • Select the “provider” from the dropdown list. Give “Server name, Authentication and Data base”

  • Press “Test Connection” to ensure that there are no connection errors. Press “OK”, then the “Connection Manager” window will disappear.
  • Press “OK” button in the “Configure OLEDB Connection Manager” Window.

  • “Configure OLEDB Connection Manager” Window will disappear.
  • Connection manager creation is finished.

  • If we need to modify the connection, right click on the connection (highlighted in the above screen shot) and select edit option.


BUSINESS INTEELLIGENCE DEVELOPMENT STUDIO


  • Click on start button and then click on “All Programs”

  • Click on the “Microsoft SQL Server 2008 R2”, find the below screen shot for reference.

  • Under the “Microsoft SQL Server 2008 R2”, select “SQL Server Business Intelligence Development Studo”.

  • Then BIDS (Business Intelligence Development Studio) will open. Click on the “Create project option” to create new project.

  • New project window will open.

  • Choose the template as “Integration Services Project”. Give the required “Integration Services Project” name and “location” to store the project.

  • Click “OK” button, then “Sample project-Microsoft Visual Studio” window will open.

  •  we can start the SSIS package creation under the solution.


Thursday, 6 September 2012

OLEDB SOURCE


  • From Data flow sources items drag and drop the "OLEDB source" into designer surface shown below.


  •  OLEDB source is required "Connection manager" to access the data base objects.
  • Create new "OLEDB connection manager".
  • Right click on “OLEDB Source” and select edit option then “OLEDB Source Editor” window will open.


  • Specify the Connection manager , Data access made and Table name from drop down list in “OLEDB Source Editor” window, shown below.


  • After that press “OK” Button. 


  • OLEDB source mappings are finished.


Wednesday, 5 September 2012

SPLIT SOURCE DATA INTO TWO FILES

Requirement: If you want package creation requirement click here
 
Package creation:

  • In control flow drags and drop “Data flow task” into designer surface and then edit.
  • In data flow drag and drop the “Flat file source” into designer surface and map the source file( Flat file source mapping click here).
  • Drag and drop the “conditional split” transformation into designer surface.
  • Connect the “Flat file source” green arrow to the “Conditional split”.
  • Right click on the “Conditional split” and select edit option. Then “Conditional split transformation editor” window will open. 


  • We need to write our conditions in “Condition” box.
    • Condition to extract the record name ending with “e”
      • RIGHT(Name,1) == "e"
    • Condition to extract the record name ending with “k”
      • RIGHT(Name,1) == "k"


  • Click “OK” button.
  • Drag and drop two “Flat File Destination”.


  • Select the “Conditional Split”, connect the conditional split green arrow to flat file destinations. 


  • Edit the “Flat File Destinations” and map the target files (For mapping click here).


  • Execute the package.


Target files output:
Target1:


Target2: